





Remote Login Using SSH Public Key Authentication
- Create a private/public key pair
- Register the public key on the server
- Log in to the server using the private key
1. Create a private/public key pair
These steps must be performed after logging in via ssh from within the Keio network using password authentication.
In the instructions below, replace "key_name" with your chosen key name as appropriate.
a. For Windows
This section explains how to generate keys using PuTTY or Tera Term.
i. Using PuTTY
-
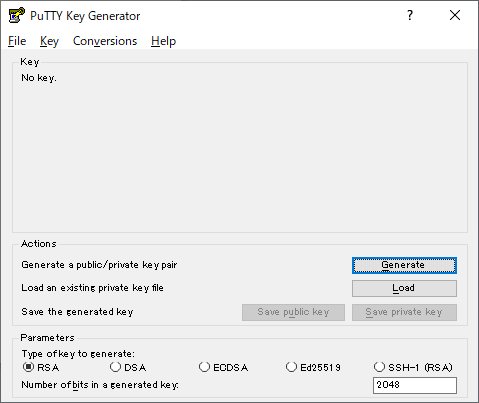
Launch PuTTYgen.
-
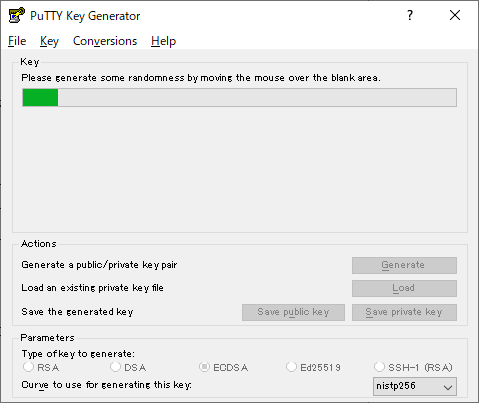
Select ECDSA under Parameters, then click Generate under Actions.
-
Move the mouse within the blank area as instructed.
-
Although ECDSA is recommended on this page, it may not be supported depending on whether your software has been updated.
If you create an ECDSA key but public key authentication fails, try using RSA instead.
-
Although ECDSA is recommended on this page, it may not be supported depending on whether your software has been updated.
-
Once the Key has been generated, enter a password (*Note) in the Key passphrase: and Confirm passphrase: fields, then click the Save private key button under Actions to save the private key. Save the private key as 'key_name'.
Also, copy the entire contents of the "Public key for pasting in to Open SSH authorized_keys file:" field into Notepad or a similar text editor and save it as 'key_name.pub'.
This is your public key.Do not use the Save public key button.
*Note: The password specified here is not your ITC account login password, but a password used to encrypt the private key file.
You will be asked for it every time you connect via ssh using key authentication.You may choose any key name and save location.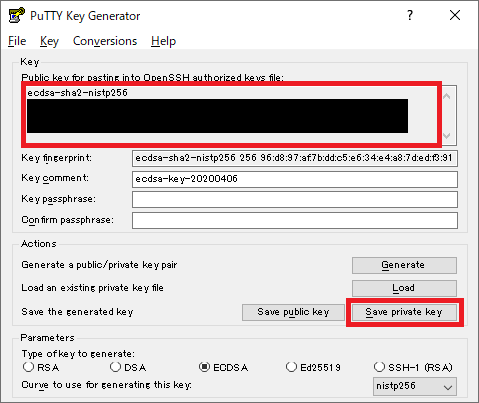
However, keep your private key file secure, as it could be used for unauthorized access if disclosed to others.
ii. Using Tera Term
-
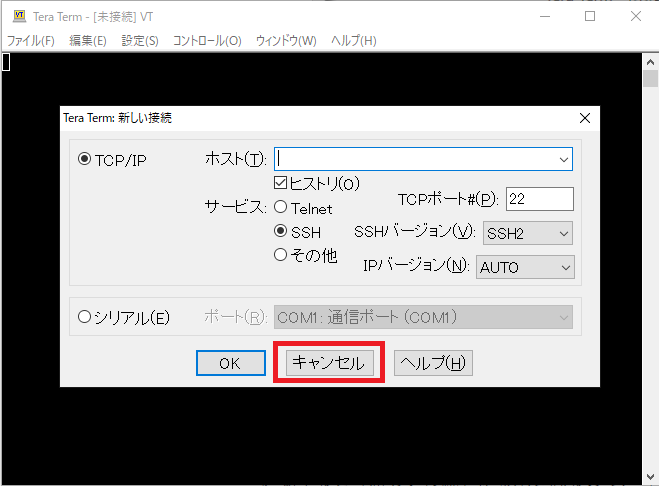
Launch Tera Term, then click Cancel to close the "Tera Term: New connection" window.
-
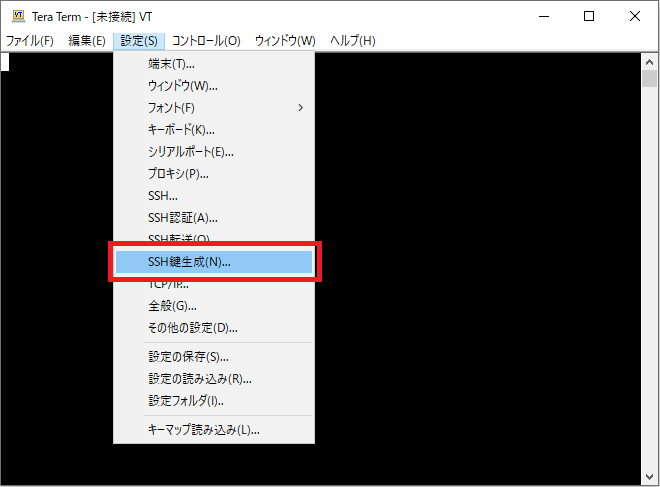
Select Setup > SSH key generator.
-
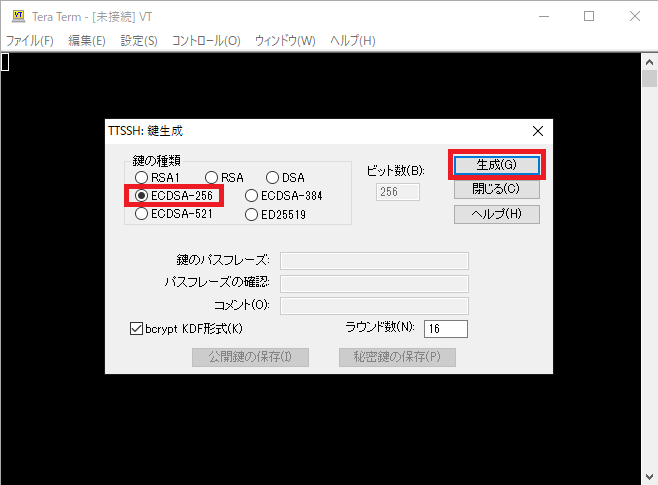
Select ECDSA-256 under Key type, then click Generate.
-
Although ECDSA is recommended on this page, it may not be supported depending on whether your software has been updated.
If you create an ECDSA key but public key authentication fails, try using RSA instead.
-
Although ECDSA is recommended on this page, it may not be supported depending on whether your software has been updated.
-
After clicking Generate, enter a passphrase, then save the public and private keys.
Save the public key as 'key_name.pub' and the private key as 'key_name'. You may choose any key name and save location.
However, keep your private key file secure, as it could be used for unauthorized access if disclosed to others.
b. For macOS and Linux (including WSL)
-
Change to the .ssh directory under your home directory.
$ cd ~/.ssh
-
If the .ssh directory does not exist, create it.
$ mkdir ~/.ssh
$ chmod 700 ~./ssh
$ cd ~/.ssh
-
If the .ssh directory does not exist, create it.
-
Generate a key pair using ECDSA.
$ ssh-keygen -t ecdsa -f key_name
Generating public/private ecdsa key pair.
Enter passphrase (empty for no passphrase):
-
Although ECDSA is recommended on this page, it may not be supported depending on whether your software has been updated.
If you create an ECDSA key but public key authentication fails, try using RSA instead.$ ssh-keygen -t rsa -f key_name
-
Although ECDSA is recommended on this page, it may not be supported depending on whether your software has been updated.
-
Enter a passphrase for the key.
Enter passphrase (empty for no passphrase): xxxxxxxx
-
Verify that a private key file named 'key_name' and a public key file named 'key_name.pub' have been created.
Keep your private key file secure, as it could be used for unauthorized access if disclosed to others.
2. Register the public key on the server
Perform the following steps on the remote host you will be logging in to.
- Upload the public key that was saved when you generated the private key.
-
Change to the .ssh directory under the client's home directory.
$ cd client_home_directory/.ssh
-
Register the public key file 'key_name.pub' as a public key to be used for public key authentication.
$ cat key_name.pub >> authorized_keys
$ chmod 600 authorized_keys
3. Log in to the server using the private key
a. For Windows
This section explains how to log in using PuTTY or Tera Term.
i. Using PuTTY
-
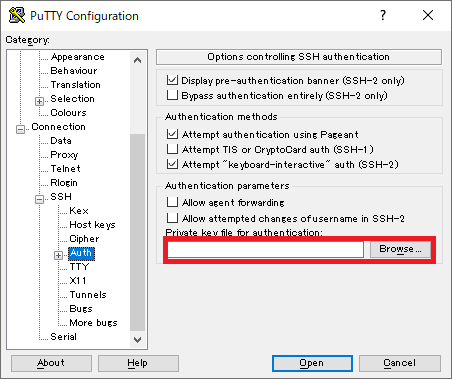
Navigate to Connection > SSH > Auth, click Brouse, and select the private key 'key_name' created above.
-
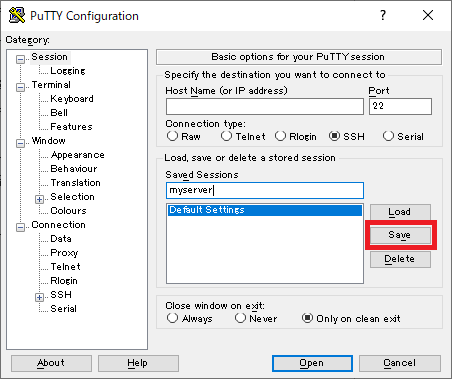
Navigate to Session and click the Save button to save these settings for easier connections in the future.
ii. Using Tera Term
-
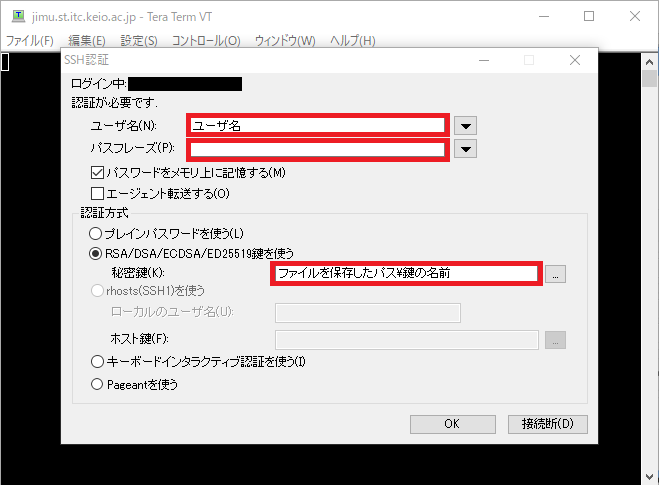
After entering the destination host name and clicking OK, the following screen appears.
-
Enter your user name and the passphrase you set for the authentication key.
Also, select "Use RSA/DSA/ECDSA/ED25519 key" as the authentication method and specify the private key 'key_name' generated in the steps above.
b. For macOS and Linux (including WSL)
-
When using the ssh command, specify the path to the private key with the -i option.
$ ssh -i ~/.ssh/key_name server_to_log_in_to
Last-Modified: October 20, 2026
The content ends at this position.